 Nessus
Configure the Nessus connector to retrieve VM information from Nessus
Objective
The purpose of this document is to provide you with a procedure for setting up the connection with Nessus. This procedure will enable the retrieval of VM information from Nessus.
Upon completion of this procedure, you will be able to provide us with the following information:
- Server IP
- Access Key
- Secret Key
Creating Access Credentials
- In the Nessus console, go to Settings → My Account → API Keys.
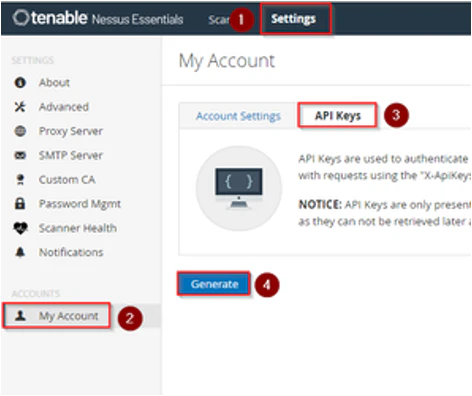
- Click on Generate to create a new API key.
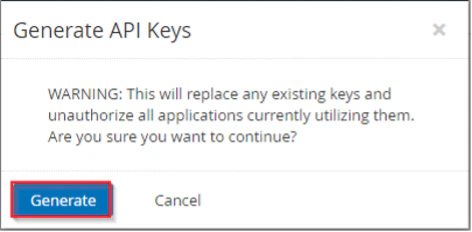
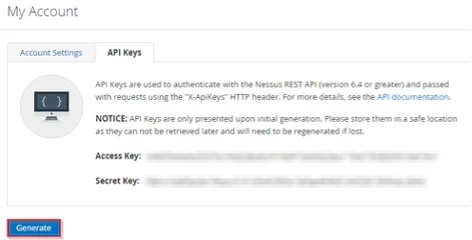
- Copy the generated Access Token and Secret Token.
Configuration Steps
1. User Account Verification
- Ensure you have a Nessus user account with appropriate permissions
- The account should have access to scan results and vulnerability data
- Verify that the user can access the API Keys section
2. API Key Generation
- Navigate to the My Account section in Settings
- Access the API Keys management page
- Generate a new API key pair (Access Key + Secret Key)
- Securely store both keys for configuration
3. Network Access Setup
- Ensure the Nessus server is accessible from your network
- Verify that the API endpoints are reachable (typically port 8834)
- Test connectivity using the generated credentials
API Capabilities
The Nessus connector will access vulnerability data including:
- Scan Results: Complete vulnerability scan reports
- Asset Information: Details about scanned systems and devices
- Vulnerability Data: CVE information, CVSS scores, and remediation guidance
- Compliance Reports: Security compliance status and findings
Information to provide in OverView
To configure the Nessus connector, please provide:
- Server IP/URL: The IP address or hostname of your Nessus server
- Access Key: The access token generated in the API Keys section
- Secret Key: The secret token generated alongside the access key
- Port: Custom port if not using standard 8834
- Protocol: HTTPS (recommended and typically required)
Nessus typically requires HTTPS connections. Ensure your server has valid SSL certificates configured.
The Nessus connector will integrate vulnerability assessment data into your security operations, providing comprehensive visibility into security weaknesses across your infrastructure.
Testing API Access
You can test the API credentials using curl:
curl -k -H "X-ApiKeys: accessKey=YOUR_ACCESS_KEY; secretKey=YOUR_SECRET_KEY" \
     "https://YOUR_SERVER:8834/server/properties"
Troubleshooting
Common Issues
- SSL Certificate Errors: Use
-kflag for self-signed certificates or configure proper certificates - Authentication Failed: Verify both access and secret keys are correct
- Network Unreachable: Check firewall rules and ensure port 8834 is accessible
- Permission Denied: Ensure the user account has appropriate scan access permissions
Required Permissions
The Nessus user account should have:
- Access to view scan results
- Permission to access vulnerability data
- API access enabled (if this is a configurable option)
Large Nessus deployments may have extensive vulnerability data. Consider scheduling data synchronization during off-peak hours to minimize impact on system performance.
Alternative: Import .nessus Files
If you prefer to import scan results as files rather than using the API, you can use the .nessus file import mode.
Supported Format
- File format:
.nessus(Nessus native XML format) - Maximum file size: 50 MB
- Scans must be completed before export
Export .nessus Files
- Access your Tenable Nessus console.
- Navigate to Scans and select a completed scan.
- Click the Export button.
- Choose the .nessus format.
- Download the generated file.
Import into OverView
- In OverView, go to Data Sources Settings > Sources.
- Select Nessus and click Configure.
- Choose the File Import mode.
- Drop your
.nessusfile in the upload area (max. 50 MB). - Click Save Configuration.
OverView will automatically import detected vulnerabilities, scanned assets and security recommendations.
Alternative: file import through DropPoint
The API access described above is the recommended method for this connector. Where it is not available (a segregated network, a version or licence without API, an export you already produce), OverView accepts file exports, to be uploaded to the bucket dedicated to Tenable Nessus.
Bucket : s3://nessus/
Example : s3://nessus/export.csv
The procedure is described in the OverView DropPoint guide: generating credentials, configuring the client, then sending files from the OverView web interface, the AWS CLI or an SDK. Its examples come pre-filled with this bucket when you follow this link.